
How to Choose a Ryobi 18V Charger for Cold-Weather Jobs?
Cold temps can stop Ryobi One+ packs from charging, shorten their life, or — in the worst case — cause permanent cell damage if you try to charge them while too cold. This guide tells you which charger features matter in winter, what workflows protect batteries on site, and the exact temperature and timing rules crews should follow.
Why does cold matter for Ryobi 18V batteries?
At low temperatures the battery’s chemistry slows: lithium-ion ions move more slowly, internal resistance rises, voltage sags under load, and smart chargers may refuse to charge. Worse — charging below safe temperatures can cause lithium plating (metallic lithium growth on the anode), which permanently reduces capacity and increases short-circuit risk. Good chargers detect pack temperature (via the pack thermistor or BMS) and delay charging until it’s safe.
Which charger features matter most for cold jobs?
When you’re choosing a charger for winter use, prioritize these features:
-
Temperature sensing / cold-delay — charger must read pack thermistor or BMS temp and delay/refuse charging until safe. This is the single most important cold-weather feature.
-
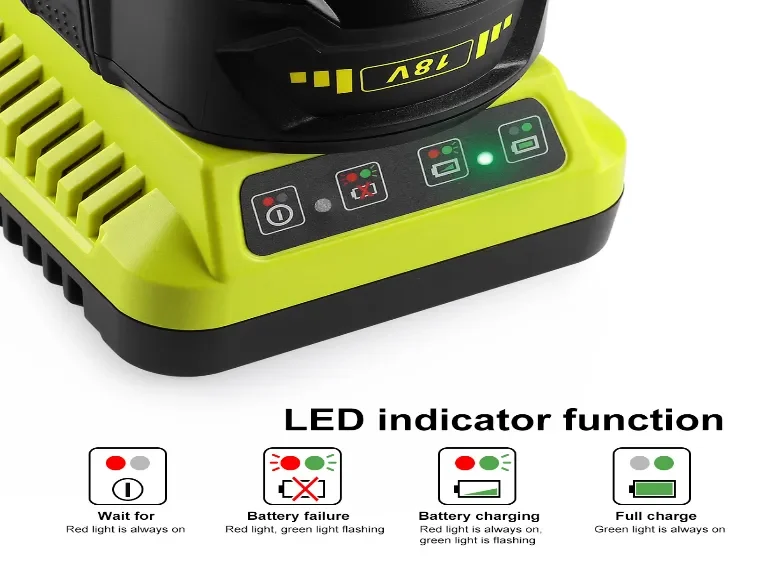
Clear cold-status indicator — a visible LED or display that shows “too cold / waiting” so crews don’t try to force charging.
-
Per-bay independent control — for multi-bay units, each port should manage charging independently so one cold/failed pack doesn’t block others.
-
Proper charging algorithm + BMS handshake — CC/CV, current limiting, soft-start/conditioning and explicit BMS handshake protect the pack while it warms.
-
Thermal throttling & conditioning mode — chargers that apply a low-current warm-up/conditioning phase are safer than those that push full current immediately.
-
Certifications & robust build — UL/CE/IEC marks and good thermal design (vents, heat-rated components). Avoid no-name bricks without test documentation.
Which charger types are best or worst for winter jobs?
-
Best: OEM single-port chargers with explicit temp sensing (simple, reliable).
-
Best for crews: Multi-bay chargers with independent bays and per-bay temp control.
-
Caution: Fast/rapid chargers — OK for warmed packs but do not use to revive cold packs; wait until pack is warm and, ideally, after conditioning.
-
Worst: Generic/unbranded “universal” chargers that lack temp control, handshake support, or per-bay isolation — avoid for winter ops.
What practical jobsite workflow should crews follow?
Use this short SOP on every shift:
-
Keep a warmed spare. Store at least one pack in a warm pocket, insulated pouch, or heated vehicle for instant swaps.
-
Pre-warm cold packs 30–60 minutes before charging (inner jacket pocket, warm van, or insulated pouch).
-
Insert pack and observe the cold/status LED. If charger shows “too cold,” warm more — do not force charge.
-
Let charger run conditioning/slow charge first. If available, allow the low-current warm-up before fast charging.
-
Stagger charging. Don’t dump many cold packs into the chargers at once; stagger so bays can bring packs up slowly.
-
Post-charge rest: Let newly charged packs sit 10–15 minutes to equalize temperature before heavy use.
-
Monitor first cycles. After warming/charging a previously cold pack, watch the first run for abnormal heat or rapid runtime loss.
What exact temperature thresholds & safety rules should I follow?
Conservative, practical field thresholds. Always check the charger/pack manual for model-specific specs.
-
Do not charge below ≈ 5 °C (41 °F). Warm first.
-
Prefer charging in ≈ 10–25 °C (50–77 °F) when possible.
-
Avoid charging above ≈ 40 °C (104 °F). Let hot packs cool before charging.
-
Inspect & stop if pack surface > ≈ 45–50 °C or if swelling, hissing, or burnt odor is present.
-
Pre-warm time: 30–60 minutes (pocket, warmed vehicle, insulated pouch).
-
Post-charge rest: 10–15 minutes before heavy/continuous use.
Important: Do not use open flame, hair dryers on high, soldering irons, or unregulated heat sources to warm packs — use body heat, insulated pouches, or thermostatted warmers only.
How do I troubleshoot cold-specific charging problems?
Quick triage and field tests:
-
Charger shows “cold” indefinitely: clean terminals, warm the pack to >5 °C, retry.
-
One charger refuses a pack but others accept it: swap chargers to isolate charger vs. pack.
-
Pack performs poorly after a cold charge: suspect lithium plating or internal damage — warm fully and test runtime; if still poor, retire the pack.
-
Pack runs warm/hot during or after charging: stop immediately — possible internal fault.
Field tools: IR thermometer for surface temp; swap tests (known-good battery on suspect charger and suspect battery on known-good charger); 10 Ω resistor or light tool load for quick voltage-sag checks.
What site-level fleet & management practices help the most?
Operational rules that scale:
-
Store spares warm (insulated pouch, heated toolbox, or vehicle cabin).
-
Train crews to watch cold LEDs and follow the pre-warm SOP.
-
Stagger charging so chargers aren’t flooded with cold packs at shift start.
-
Label and quarantine packs that had cold-charging issues; keep a log of incidents.
-
Use multi-bay chargers with per-bay control for larger teams to maintain throughput safely.
-
Rotate inventory (FIFO) and track cycles to avoid over-using single packs.
Short FAQ — quick answers to common on-site questions
Q: How long should I pre-warm a cold Ryobi pack?
A: 30–60 minutes (pocket or warm vehicle cabin) is a practical on-site guideline.
Q: Is it safe to force a charge on a cold pack?
A: No. Forcing a charge can cause lithium plating and permanent battery damage. Always warm first.
Q: Can I use a fast charger in winter?
A: Only after the pack reaches a safe temperature and — ideally — after the charger’s conditioning/warm-up phase. Do not fast-charge directly from a cold state.
Conclusion & next steps — what should I buy or make for my crew?
For cold-weather jobs pick a charger that senses pack temperature / reads the BMS, shows a clear cold-status indicator, and provides per-bay independent control if you run multiple packs. Combine that hardware choice with a warming workflow (30–60 minute pre-warm, insulated spares, staggered charging, and a 10–15 minute post-charge rest) to keep crews productive while protecting battery life and safety.
Pro tip: Always verify the exact operating and charging temperature windows in the charger and battery manuals before relying on these rules in mission-critical work.
One-Page Laminated Jobsite Card (Printable — Markdown)
RYOBI 18V COLD-WEATHER CHARGING – JOBSITE CARD
Quick rule: Do not charge below ~5 °C (41 °F). Pre-warm 30–60 min.
Before you charge
-
Inspect pack for swelling, cracks, leaks, or burn smell → DO NOT USE if present.
-
Clean terminals with 70%+ isopropyl alcohol; dry fully.
-
Check charger/manual: does it show a “cold” indicator or cold-delay?
Pre-warm
-
Warm in inner jacket pocket, vehicle cabin, or insulated pouch for 30–60 minutes.
Charging
-
Insert pack; observe status LED:
-
If “too cold / waiting” → warm more.
-
If charging starts → allow conditioning/slow charge first.
-
-
Prefer standard charge for recently warmed packs; use fast charge only after pack is warm and conditioning completed.
Post-charge
-
Let pack rest 10–15 minutes before heavy use.
-
Monitor first run for abnormal heat or reduced runtime.
Temperature thresholds
-
Don’t charge below ≈ 5 °C (41 °F).
-
Prefer 10–25 °C (50–77 °F) for charging.
-
Don’t charge above ≈ 40 °C (104 °F).
-
Stop & inspect if pack surface > ≈ 45–50 °C.
Quick troubleshooting
-
Charger shows “cold” → warm pack, retry.
-
Charger accepts other packs → suspect battery.
-
Suspect pack works on other charger → suspect charger.
-
Pack still poor after warm test → retire & recycle.
Fleet rules
-
Keep warmed spare packs accessible.
-
Stagger charging cycles; avoid charging many cold packs simultaneously.
-
Log packs showing cold-related faults; quarantine suspect units.
Emergency
-
If pack smokes or ignites: unplug (if safe), move outdoors with insulated tools, evacuate, call emergency services.