
How to Check if a Craftsman 20V Battery Fits Another Craftsman Tool
A practical, safety-first walk-through to verify physical fit, electrical compatibility, and safe operation when you want to use one Craftsman 20V battery in a different Craftsman tool.
At a Glance: Quick Rules
-
Likely OK when: battery and tool are explicitly from the same 20V family (same platform name in manuals/product pages), the battery seats firmly, and both specify Li-ion chemistry.
-
Risky / Not OK when: mixing legacy 19.2V NiCd/NiMH with 20V Li-ion, forcing a mechanical fit, or charging Li-ion packs with NiCd/NiMH chargers.
-
Rule of thumb: mechanical fit is the first gate. If it fails, stop — do not proceed electrically.
Step 1 — Identify What You Have (Labels & Model Numbers)
-
Read the battery label for chemistry (Li-ion, NiCd, NiMH), nominal voltage (19.2V or 20V Max), model number, and date code.
-
Check the tool markings. Model number and platform name are usually near the battery bay or inside the manual.
-
Match product family. If both tool and battery show the same family (for example, V20), compatibility is likely.
-
If unsure: search the model on the Craftsman site or consult the manual’s compatibility chart before testing.
Step 2 — Mechanical Check (First Gate, No Power)
Do not apply power until mechanical checks pass.
-
Seat test: battery should slide fully, click, and feel solid. Any wobble = poor contact risk.
-
Latch & release: lock/unlock several times to confirm smooth engagement.
-
Terminal alignment: contacts should line up correctly and be clean.
-
Clearance & balance: ensure the pack doesn’t obstruct accessories or unbalance the tool.
If any mechanical check fails — stop here. Do not power the tool.
Step 3 — Initial LED / Handshake Check (No Heavy Load)
-
Insert the battery and watch the tool or charger LEDs.
-
Normal: tool ready, no fault lights.
-
Fault: flashing/blinking or silence = likely mismatch.
-
-
Consult the tool manual for LED meanings.
If the tool shows an error, do not proceed further.
Step 4 — Electrical Sanity Checks (Multimeter)
Equipment: digital multimeter, insulated probes, small known-good load (e.g., drill unloaded).
Safety: wear eye protection, and never test swollen, leaking, or overheated packs.
-
Measure Open-Circuit Voltage (OCV):
-
Charged 20V Li-ion = ≈ 21.0–21.6 V
-
Charged 19.2V NiCd/NiMH = ≈ 20.8–21.6 V
-
<15–17 V → deeply discharged or damaged → stop testing.
-
-
Brief unloaded run (10–20 s): tool should run smoothly. Any smoke, smell, or shutdown = stop.
-
Measure under light load: voltage should stay stable with only modest sag. Large drops = mismatch or weak pack.
Quick interpretation:
-
OCV ~21V and stable under load → likely OK.
-
Trips under light load → tool/BMS mismatch.
-
Low OCV or major sag → unsafe, stop.
Step 5 — Functional Test Under Real Use
Only proceed if earlier steps passed.
-
Run a normal task for 1–3 minutes.
-
Monitor for shutdowns, overheating, buzzing, or flashing error lights.
-
Compare against a known-good battery/tool if issues arise.
Abort immediately if: overheating, smoke, or persistent error codes appear.

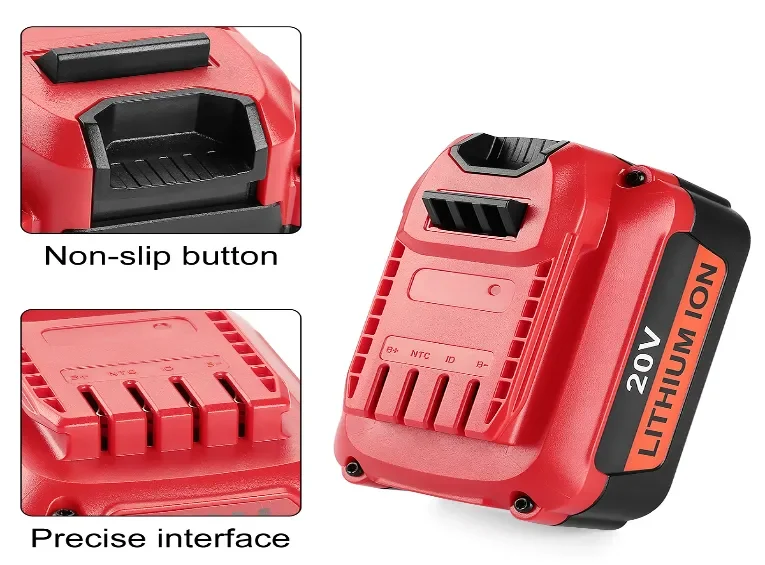
CRA-20V-LI Lithium-Ion Battery For Craftsman CMCCS/CMCCSP Power Tools
Adapters & Retrofit Kits
-
Passive adapters (mechanical only): risky — don’t correct handshake or charging. High chance of arcing or tool damage.
-
Active adapters / certified kits: acceptable if UL/CE listed with proper BMS and regulation. Use under supervision.
-
Professional rebuilds (cell swap + new BMS): safest technical method, but cost and warranty loss usually make buying the correct pack more practical.
Specific Risks of Mixing Packs
-
Arcing / poor contacts → heat, welded terminals.
-
BMS lockouts → Li-ion packs may refuse power without the right handshake.
-
Charging mismatch → NiCd/NiMH chargers can overheat Li-ion packs.
-
Tool stress → unexpected current draw can damage motors and controllers.
Warranty, Safety & Compliance Notes
-
Third-party packs or adapters may void warranties.
-
Look for UL, IEC 62133, UN38.3 safety markings on Li-ion packs.
-
Recycle damaged packs safely: tape terminals and take to a certified facility.
Troubleshooting Flow if Swap Fails
-
Clean contacts and retry.
-
Cross-test: battery in another tool, tool with another battery.
-
Measure OCV and compare against ~21V (charged Li-ion).
-
Verify charger with a known-good pack.
-
If unresolved: replace with official pack or consult service center.
Decision Checklist (Copy & Use)
1) Same platform family? (Yes → continue; No → stop)
2) Chemistry match (Li-ion vs NiCd/NiMH)? (Yes → continue)
3) Mechanical seat & latch OK? (Yes → continue)
4) Contacts aligned & clean? (Yes → continue)
5) OCV in range? (~21V charged Li-ion) (Yes → continue)
6) Unloaded run (10–20 s) — normal? (Yes → continue)
7) Light-load stable voltage? (Yes → continue)
8) Real-task run normal? (Yes → safe to use)

If any step fails → stop, isolate battery, and replace or service.
Final Tips
-
Always verify model numbers. Do not assume by appearance alone.
-
Label and separate packs to prevent mistakes in mixed shops.
-
Standardize platforms when possible to simplify inventory.
-
If adapting is unavoidable → use certified active adapters, not cheap mechanical shells.